I have some exciting news to share: as of April 2014, the Crestwood woods are now officially recognized as a school forest! This designation allows our school to receive funding and support from the Wisconsin DNR for supplies and curriculum development, among other things. There is a core group of dedicated current and retired staff members and community volunteers who have worked very hard to make this happen, and we owe them a big THANK YOU!
Part of the restoration process is tree planting; in fact, over the last few years, Crestwood students have planted more than 400 trees on school property. It's a big job keeping track of them all. Last week, fourth graders from Ms. Handa's and Mr. Waity's classes spent several hours outside locating trees, measuring growth, and entering data onto a spreadsheet on iPads. Have you ever wondered how to measure a tree? Here is a step-by-step tutorial!
*ETA: I should add a preliminary step here, which is to assemble your Tree Team and assign a task to everyone. You need a Navigator (to locate the trees using the GPS), a Scribe (to record location and measurement data on the iPad), an Illustrator (to sketch the tree on paper), one or two Measurers (with the caliper for the tree diameter and a tape measure for height and new growth), a Photographer, and a Checker (someone to hold the big sheet of white paper behind the tree while the picture is being taken). These tasks can be rotated with each tree or remain consistent throughout the data collection process. Leave that up to the kids, and it's an interesting exercise in project management and leadership/diplomacy skills.
Step 1: Locate your tree
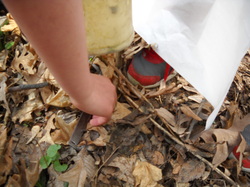
Every tree was planted with a protective tube around its trunk, and every tube was labeled with a number in the order it was planted. Students were given GPS coordinates for each tree, along with a GPS device to help locate each tree.
Located at the bottom of each tree is also a luggage tag with the tree type (Red Oak, Sugar Maple, etc) and the date it was planted. All of this information was recorded in the spreadsheet.
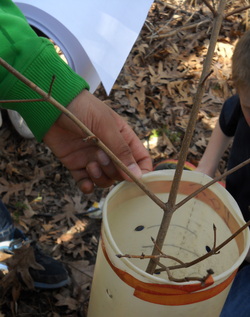
Step 2: Measure the diameter of the tree
Students used a caliper to measure the base of the trunk and recorded the diameter in centimeters.
Students used a caliper to measure the base of the trunk and recorded the diameter in centimeters.
Step 3: Check for new growth
One data point to enter with this step was to answer the simple question: is the tree still alive? For one group who searched at least ten minutes for a numbered tube and finally found it, only to discover the stunted, brittle remains of a red oak planted in 2010, the answer was, alas, a definitive, inarguable no, not alive.
For the rest of the trees, students checked for new growth by inspecting the color of the bark, where the buds appeared, and so forth. They then measured the area of new growth and recorded that on the spreadsheet.
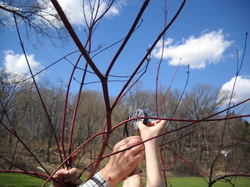
Step 4: Measure the tree's height
This step seems self-explanatory enough, doesn't it? Most of the trees are still so young that it wasn't a problem for the average 10-year-old kid to measure their height. For one particularly healthy red dogwood (pictured left), no one could come close to reaching to the top, so we had to come up with a different way of calculating its height: hold the tape measure halfway up the tree, then double that measurement.
This step seems self-explanatory enough, doesn't it? Most of the trees are still so young that it wasn't a problem for the average 10-year-old kid to measure their height. For one particularly healthy red dogwood (pictured left), no one could come close to reaching to the top, so we had to come up with a different way of calculating its height: hold the tape measure halfway up the tree, then double that measurement.
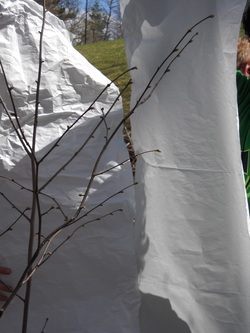
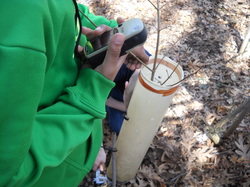
Step 5: Take a picture
This is one part of data collection in which the school's iPads were very handy. Sure, you can fill in all those measurements on a piece of paper (though using an electronic spreadsheet is much more efficient), but when it comes to taking photographs, there is no match for a device with a camera and touchscreen where in mere seconds you can click a picture, then drag it straight to the spreadsheet and resize it.
Of course, there's always the temptation on the students' part to start taking selfies out in the woods instead of going back to the spreadsheet, but hey, at least they were enjoying themselves.
Now, can you guess why we had those big white sheets of paper behind the tree?
 RSS Feed
